As one of the best online photo galleries for photographers, picdrop offers advanced features that make photo sharing, marking, and commenting easy, both for you as a professional photographer and your clients.
In this picdrop guide, we’ll show you how to set up picdrop to match your unique photo-sharing needs. You can change the setting for each gallery, allowing you to perfectly customize how you want to present your photos and collaborate with your client.
If you’re new to picdrop, we recommend going through our onboarding guide first to understand how picdrop’s online photo-sharing app works and its main features.
1. Collaborating with Clients
Comments on Photos
Color Flags for Quick Photo Selection and Rating
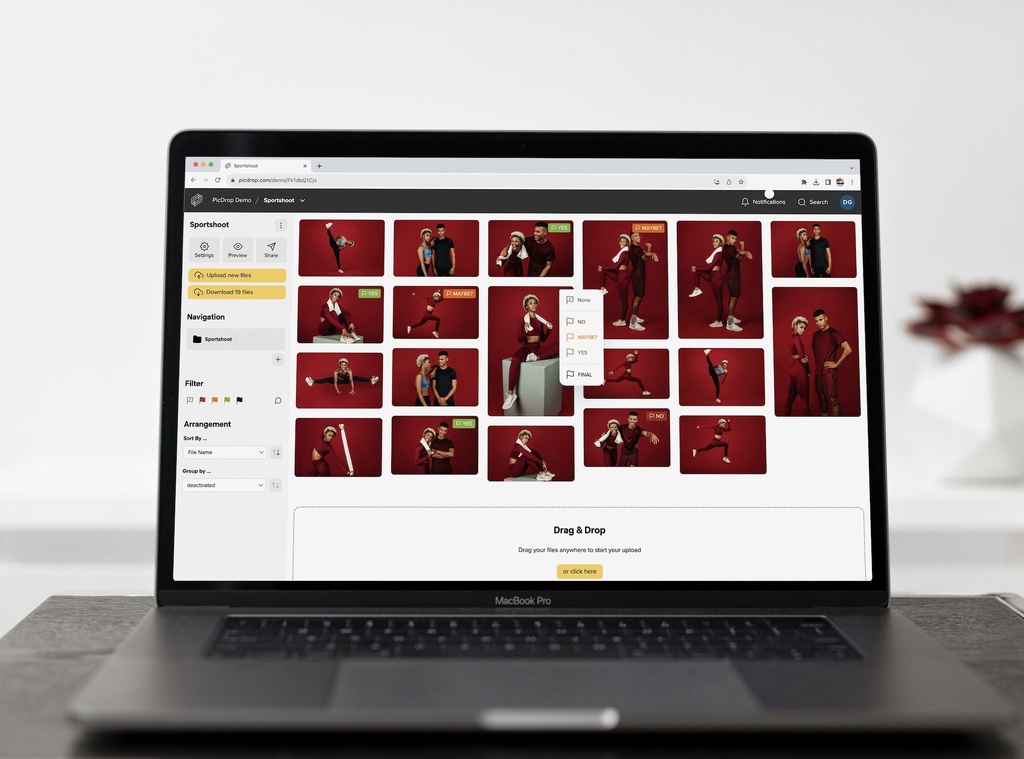
Color flags provide a simple and efficient way for you and your clients to mark, select, and rate files. You’ll find the color flag menu at the top right corner of image previews in gallery overviews, and at the bottom left in the single-file view.
Each color flag can be selected with a click. You and your clients can choose between red, yellow, green, and black / FINAL. Color flags are visible in real-time to all current gallery visitors.
If you want to customize color flags to better suit your workflow, there are two options: starting from the Pro plan, you can assign individual names to each color flag, and you can hide color flags that you do not want to use.
Filter Out Color Flags
After your clients have selected their pictures by color flags, you can filter out the flagged pictures in a few seconds on your computer. You won’t have to spend hours searching for the right files if you follow our steps to filter out color flags. This saves you a lot of work and precious time.
Create and Manage Selections
Your clients can easily create and manage selections within your gallery. By clicking the blue “+” button on a photo, they can add it to a selection. Once a selection is complete, they can save and name it.
You will be notified via email whenever a new selection is created or modified.
Filter Out Selected Photos
After your clients have created a selection, you can also filter it out on your computer in just a few seconds. Follow our detailed instructions on how to filter out a selection of files and continue working directly with the selection.
Selections vs. Color Flags: Which is Right for You?
This guide will help you determine the best use case for selections and color flags in your PicDrop galleries. Discover the key differences and how to effectively use each feature.
Client Upload
If you want your clients to be able to upload files to their gallery, then simply activate the client upload in the Gallery Settings. Your clients can simply drag and drop their files into the gallery’s browser window. Of course, you will be informed about every upload via e-mail.
Good to know: All the features described, such as color flags, selections, comments, and customer uploads, can be found in the edit mode. Therefore, make sure that your customers can use the edit mode for the gallery.
Work In Real-Time with Clients
Everything that happens in your galleries will be displayed in real time to everyone who opened your gallery. Whether uploads, comments or color flags – communicating and collaborating with your clients has never been faster or easier.
Using picdrop for International Clients
picdrop automatically checks the language settings of the browser of your clients in the background and then displays the entire picdrop interface in English or in German.
Instant Notifications
In the Notifications, you always have an eye on what’s going on in your galleries. You can find them in your gallery overview and in every gallery at the top right of the Gallery Settings alongside the “Share” button. We notify you about:
- Gallery visits
- Color flags
- Picture selections
- Comments
- Downloads
- Client uploads
Since we do not require your clients to log in, we will not be able to identify who it is. Therefore, we only label them as “someone” or “a visitor” in the events. However, if they have provided a name when adding a comment or creating a picture selection, it will be displayed. You will also be informed about some of these events by e-mail.
2. Gallery Settings
In the Gallery Settings, you can define all picdrop functions as well as the appearance of each gallery. A detailed list of all the functions of the Gallery Settings and the functions you can apply for each client can be found in our FAQ.
Default Gallery Settings
In your picdrop Account Preferences, you can predefine most areas of the Gallery Settings. These settings will then be used for all newly created galleries. Defining default gallery settings can be practical and save you time when your clients are often similar in their needs and requirements. Settings that are unique to a gallery, such as a gallery password, ALWAYS have to be set in the Gallery Settings of the respective gallery.
Starting with the Pro plan, you will find the option to rename and hide individual color flags right here in your gallery default settings.
Presentation Mode Gallery
picdrop’s Presentation Mode is a way to show off your files without a lot of gimmicks. Especially when it comes to the look and the presentation (e.g. wedding gallery etc.), we recommend using the Presentation Mode. We have compiled all the special features and advantages of the Presentation Mode for you here.
3. Export Files from Adobe Lightroom to picdrop
In the first steps, we have explained to you how to upload your first pictures easily via the browser upload in picdrop. In addition, there are other ways to load your files in picdrop.
With our Lightroom Plugin, you can upload files directly from Lightroom to picdrop. You can find it in your Account Preferences in the Lightroom section. If you cannot find this section in your account settings, just reach out to us, and we will take care of it for you.
4. Using Sub-Galleries
Just as you have created your first galleries, you can also create sub-galleries in picdrop and thus give your work the desired structure you love. The structure of galleries and sub-galleries behave exactly the same as the folders on your PC. You create a sub-gallery by clicking on the “Create sub-gallery” button or by clicking on the three dots next to the gallery name on the left side. You alone decide how you want to sort your work.
5. Keyboard Shortcuts
Shortcuts make life a lot easier, right? That’s why we’ve included some keyboard shortcuts in picdrop to make your job easier. You can find an overview here.
6. Simplify File Names Automatically
picdrop examines your pictures and file names in a gallery according to recurring patterns and cuts them off intelligently. Of course, you can still view the full file name and more file information by clicking on the shortened file name.
In the single file view, the complete file name is always displayed as well. If you do not want picdrop to simplify your filenames, you can disable this feature in your Account Preferences with one click.
7. Downloads and Watermark Protection
If you allow it, your clients can download their pictures individually, as a selection, or as an entire gallery via picdrop. You can activate the download in the Gallery Settings in the “General Settings” area.
To protect against screenshots, use the picdrop watermark function. In your Account Preferences you can upload your logo and use it as your desired watermark. Afterward, you can select a watermark in the Gallery Setting and picdrop, then put this over your preview image
8. Make Your picdrop Link Look Like Your Domain (the Web Forwarder)
If you want picdrop to stay invisible to your clients, then you should use our Web Forwarder. Your gallery links will appear as www.yourwebsite.com/clients/.
Learn more about Web Forwarder in your Account Settings under “Web Forwarder.“ All steps to install and help with known error sources can be found here.
9. Logo and Website
In order to show your work and your homepage within the delivered gallery, just add your logo and your website in the Account Preferences. Both will be displayed automatically in each of your galleries and your clients will see more of your brand.
10. The Advantages of the picdrop Pro Plan
With picdrop Pro, you can use endless galleries and 500 GB of storage space. In addition, you can use all the layouts and functions, as well as the watermark, customizable color flags, and the Presentation Mode. You can see all our plans here.
11. Use picdrop as a Team With the Business Plan
The picdrop Business bundles offer you and your team all known picdrop functions. On top of that, there is an extra portion of storage (1 TB) and our handy function for team collaboration. You can find all the information here.
Congratulations!
We hope that this guide has helped you. Do you have any questions or feedback for us? E-mail us at hello@picdrop.com!