How to install my Lightroom plug-in for picdrop?
Important info about the Lightroom plugin.
The Lightroom plugin from picdrop is automatically activated for all accounts created before June 2022. If your account was created after June 2022, you will not find the plugin in your account settings.
But don't worry: if you can't do without the Lightroom plugin for your work, please email us at hello@picdrop.com and we'll be happy to help.
1. Download the plugin
Attention: If you are using the outdated operating system macOS Mojave the Lightroom plugin will only work with Lightroom Classic version 10.2 or older. Newer versions of Lightroom Classic require at least macOS Catalina for you to be able to use the plugin.
Go to the "Account Settings" in your picdrop account and download the plugin under "Lightroom".
Save the ZIP file to your hard drive - preferably in a place where you won't accidentally delete it later. It's a good idea to put the plugin in the same place where you already store your Lightroom library. Your Lightroom installation folder is also a suitable place.
Here you unzip the file. The result is a file called "picdropftpupload.lrplugin", which you simply leave there.
2. Install the plugin
Now you have to add the downloaded and unzipped plugin to Lightroom. It works like this:
- Start Lightroom Classic
- Open the "Plugin Manager" via the menu File > Plugin Manager
- Click on the button "Add" in the lower left corner
- Search for the plugin named "picdropftpupload.lrplugin" and confirm your selection.
- Close the plugin manager
3. Configure the plugin before your first upload
Before your first upload with the plugin you have to configure the FTP settings for the plugin. Don't worry: this step is only necessary once!
To configure the plugin, select one or more images in Lightroom and open the Export dialog. This is the same dialog you use to save images to your hard drive.
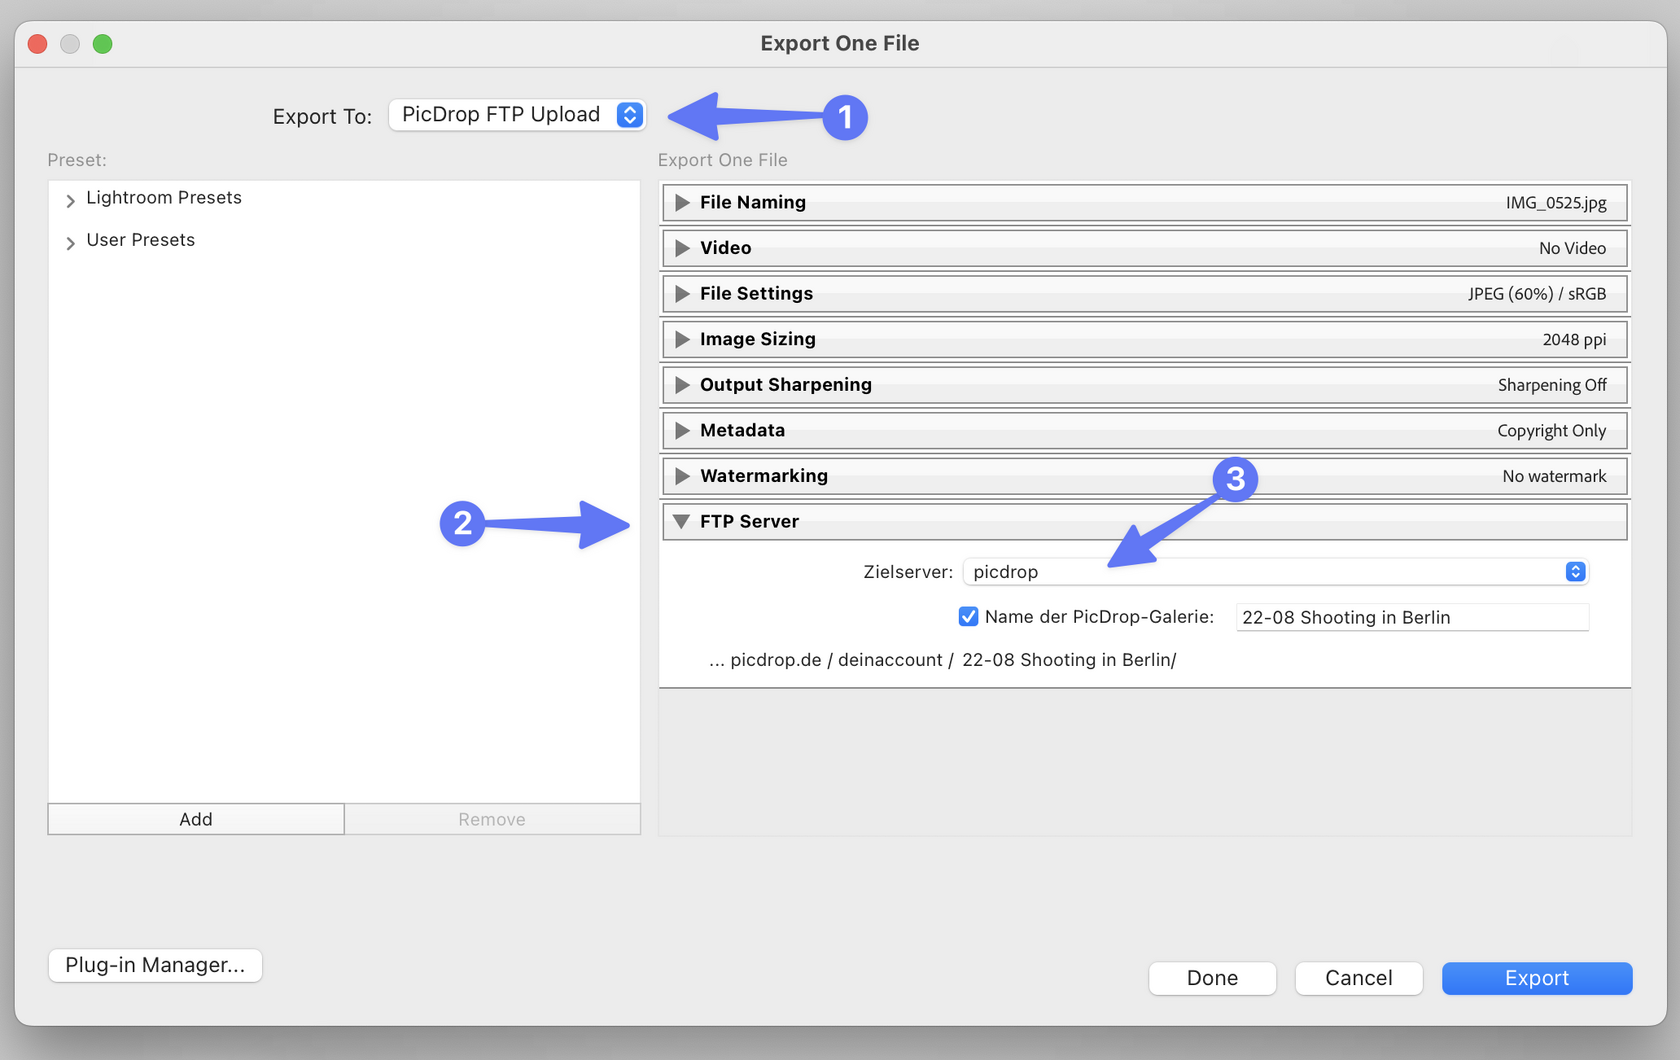
In the Export dialog you will see the following window:

Select "picdrop FTP Upload" from the dropdown menu at the top.
Then, at the bottom, below the settings for your files, in the "FTP Server" area, click on the dropdown menu with the name Zielserver.
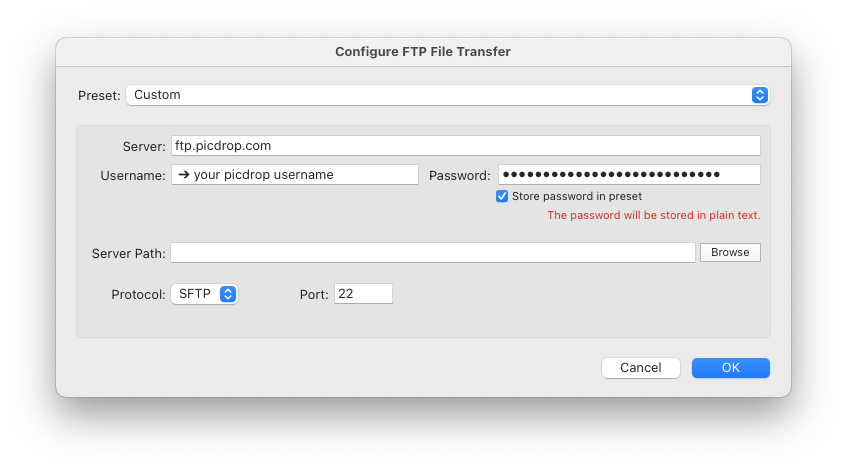
Select "Edit ..." and a new window with the title "Configure FTP file transfer" will open. In this window, fill in all the fields exactly as shown below.

Server: ftp.picdrop.com
Username: your picdrop username
Password: your password for your picdrop account
Server Path: please leave empty
Protocol: SFTP
Port: 22
Important!
Make sure to click Custom at the top of the Preset section and select Save Current Settings as New Preset ...

Enter the name "picdrop" and click on "Create".
After that click on "OK".
This is the only way to save your settings permanently and you don't have to enter them every time you export.
Done - your picdrop plugin is now ready to use!
If you have followed all the steps, you can now select images in Lightroom at any time and upload them directly to your picdrop account using the "Export" function.
4. Start your first upload from Lightroom to picdrop
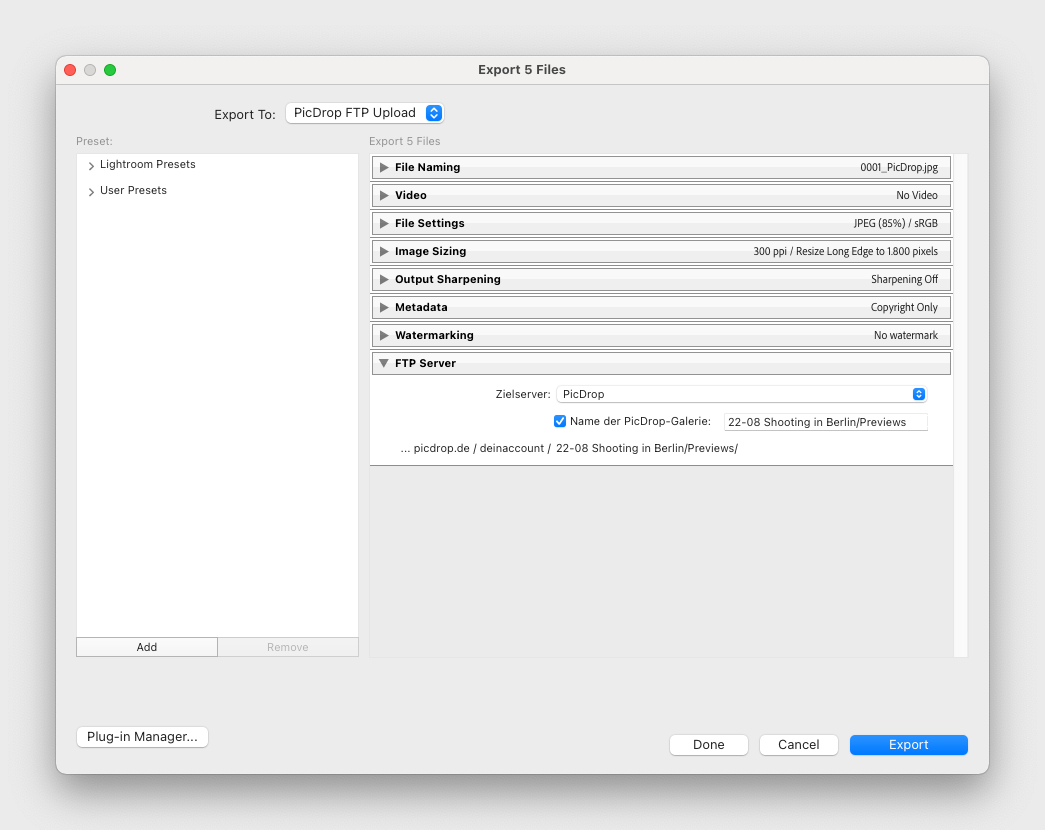
To do this, select "picdrop FTP Upload" at the top and adjust your settings for image size, sharpness, etc. as usual.
At the very bottom of the Export dialog at FTP-Server you set "picdrop" as destination server and use the settings you just created with this tutorial.
Now you just have to enter the name of a new or existing gallery where you want to upload the pictures.
Please enter the gallery name in the pattern shown below. Please do not use the secure link or similar shortcuts.
Of course you can also just create a new gallery. All you need to do is to type its name. It is also possible to create sub-galleries from within the export dialog.
Example:
The destination folder "Wedding”
becomes
www.picdrop.com/yourUsername/wedding
The destination subfolder "Wedding/Cake" becomes
www.picdrop.com/yourUsername/wedding/cake
IMPORTANT: Please do not use special characters in folder names (&, $, /, é, à, etc...).

Finally, click on the blue Export button at the bottom right and the upload to your picdrop gallery will start!
After the successful upload you will find all pictures in your picdrop account in the gallery you chose in Lightroom.
Error messages during export? Other problems?
There are problems with the upload or you get an error message? Please read this article carefully. If the solutions from the article don't help, just write us at hello@picdrop.com and we'll see together how we can solve the problem.
PS: The plugin is not required to use picdrop. You can also always upload images via drag & drop or any other FTP client. But it is handy, isn’t it?
